
You are currently browsing the monthly archive for April 2013.
There’s a big blank wall in my kitchen that has been crying out to me for a fantastic piece of art. The space is between cabinets, just above the cutting board where I spend 98% of my time doing prep work.

Big. Blank. Space.

So it clearly needs something. A couple times over the last several months I’ve browsed art.com and allposters.com for cheap prints that would work there. The main colors in the kitchen/dining area are orangey wood (cabinets and table), leaf green, and a bit of yellow, red, and cobalt to boot. I would never advise picking art because it matches your room colors – my mom has worked in the fine art world for decades and at least partly because of her influence I believe you should hang art that you love, whether it cost $1 or $1000. Still, I want something that looks like it belongs in here.
Another factor is that I’m most frequently drawn to landscapes that use most of the colors of the rainbow. It’s a plus if they include curves of coastline. Witness some of my other favorite pieces of art from around the house. Sorry about the reflections on some of these!


See? I’m predictable. Plenty of blue, some red, some yellow, scenic. This is totally my favorite type of piece. Although thankfully I don’t have a house full of landscapes – sometimes I go for quirky graphic pieces too.

(The text under the lobster says, “The next time You find Yourself in a Pinch to deliver the Ultimate in Foil Stamping and Blind Embossing, Remeber, Aladdin Litho…For quality work, guaranteed to get You out of hot Water in a Snap!” It’s a trade show sample back from when my parents owned a typesetting business in the 80’s. Awesome.)

Yes, that is an internet meme that I blew up to 8×10 and framed.
So as for the kitchen, I found this piece I love for $40 after coupon, shipping, and tax, and am wondering whether I should click on that oh-so-easy Paypal button. I’m planning to sit on the decision for at least 24 hours anyway, but I wanted to know your vote. It’s about $15 more than I was initially planning to spend, but apart from the lines of image itself I also love the colors and the brush technique and the illusion of flatness in the depth of field.
This is the piece – it’s about 26″x20″ before framing and matting – with a digital frame rendered in. I’d get a frame that fits the image from the thrift store.

And here’s a mockup of it framed and in situ, Before/After.

This painting is so “me” and yet I find I’m hesitant to pull the trigger simply because I’ve been looking so long. Maybe I’ll find something just as awesome for less money… maybe it doesn’t look as good in person… maybe I finally found something I love for almost the right price and I should get it? What do you think?
Last time I shared pictures of our master bedroom I had just conquered the problem of how to deal with the burgundy carpet and had settled on a paint color that both myself and the Chief were happy with. You got a sneak peak of the finished closet but last saw the room looking like this:

As it turns out, the secret to dealing with burgundy carpeting is to completely stuff the room with furniture as this will cover almost every square foot of the offending carpet and you will barely notice it’s there because what’s visible is so dark it just recedes into space. (I’m only partly kidding.)
This to say, there is a lot of stuff in our bedroom.
Here’s what we managed to fit onto the floor of our 11×10 master bedroom and nursery, not including anything hanging on walls or stashed on shelves:
- California King platform bed
- mini crib
- medium sized dresser
- large dresser
- small nightstand
- diapering basket
- 2 laundry baskets
Besides figuring out a workable floorplan, the other big challenge was to come up with a color scheme that made the burgundy carpet seem intentional. For a while my plan was to use cream, white, yellow, and brown for a neutral look with perhaps a touch of green for color, but I was not entirely happy about ignoring the carpet color in that plan. It’s not what professionals do. One day I had a brainstorm. One of my favorite shirts is a striped tee in… burgundy and orange! I decided to make those my accent colors for the room. I could pull in the carpet color and still have the serenity of warm neutrals – something like this.

The room still has plenty of tweaking to be done, but here are some in-progress shots.
This is the crib corner.

Although you can’t see it super well, I got the idea for a crib skirt from View Along The Way but I was even lazier more creative than Kelly. Instead of sewing three panels and thumbtacking them to the crib’s mattress base at the correct height, I used a shawl I already owned and upholstery-stapled it to the mattress platform. The three bins on the wall shelf hold cloth diapering stuff, onesies, and other clothes. The awesome pink-to-orange ombre box is from Target and has random small baby items in it. I just couldn’t turn the whole top of my dresser into a changing table. I need someplace for my perfumes and pretty boxes, you know? Changing shall happen on the nearest flat surface.
To the left of that spot is the big dresser with the Chief’s clothes. He’s had this dresser since childhood if I recall, and it’s been repainted a lot and acquired handles made out of bolts at some point. Maybe some day we’ll find a nice antique to replace it but for now, hey, at least it’s brown and that works for me.

I put my brass and black lamp on it and made a nice wall collage of two moody prints (free art from books) and my corkboard jewelry organizer. I’ve kept my jewelry like this for years and I love it – I mostly wear earrings and it’s really ideal. It’s just a bunch of clear pushpins in an off the shelf corkboard. Also, please note the white noise machine below the art. Keeping it real! I think this thing will be a lifesaver for sharing a room with Baby S.
Under the long side of the bed I have three large bins that are easy to access: one for my most frequently worn shoes, and two for baby clothes in bigger sizes and baby blankets/bibs/whatnot. The Chief keeps his shoes lined up in a row under the end of the bed.
Here’s our bed with the closet, nightstand, and laundry baskets beyond.

You can see the pillow on the bed and the flowerpot with ivy are bringing in some more of that orange accent color. The pillow has burgundy in it as well – you can see it better in the next photos. The throw at the end of the bed is the highly textured Ofelia throw from Ikea. Texture is important to me for this room and I’m trying to include as much as possible to add interest to a mostly neutral color scheme and to create that nest-y, cozy, inviting feel in this low-sunlight bedroom.
The cat loves that textured throw.

In fact all the cats do.

How considerate of them to match the color scheme ;-)
Here’s a shot from a little farther back to give you the context for everything.

My next plans for the bedroom are to keep bringing in color and texture. I’ve got a great orange and burgundy polka dot print that I’ll make a mobile out of and hang over the crib. I have a piece of cream-and-gold cloth to make an upholstered headboard, probably tufted, and I’d like to add some wall sconces around the bed. Here’s a quick mockup.

The closet may get curtains hung over it at some point, and there definitely needs to be some more wall art. The plain white curtains will get some colored ribbon trim. I’m sure I’ll think of other tweaks as I move forward!
I’m so happy with the foundations of our bedroom. It is a great relief to have an idea about colors that I can move forward with, and I’m looking forward to lots of fun bringing in the details. How do you like the progress so far?
At some point in college, for some forgotten reason, I was inspired to write out a page-long description of my ideal marriage and my ideal man. It metamorphosed into a fantasy of me as a gloriously wild and free – yet domestic and tranquil – woman riding her horse bareback across green hills, coming back home at dusk to be enfolded in the strong and manly arms of my curly haired husband who had been home growing vegetables and watching our toddler while I did valiant world changing magical things.
I about died laughing as I typed that out. First of all, the wonderful reality is so different from the vision, and second of all, dreams are important but that one was mostly rooted in self-centeredness.
It is true that I thought I’d probably marry someone wise and gentle who gardened and read a lot. Instead, my husband is loud, smart, highly active, a natural born mechanic/engineer, who works till he drops then he watches TV. Oh, and he homebrews.
So I’ve been wanting to put in a vegetable garden for a couple years now. This year, we finally got the last of the giant junk & concrete pile out of the backyard to reveal the spot where a vegetable garden had thrived when his parents lived here.

I bought organic, non-GMO seeds this winter in hopes of planting at last, yet I worried that since there was no water source out back, I would not be able to sustain a garden and would have to wait another season.
The Chief’s homebrewing came to my rescue! He turned up one day with hop vine rhizomes to plant so that he could have homegrown hops in his homemade beers, and two days later there was a complete watering system piped up to the vegetable garden site, plus a big trellis to support the vines. I guess it’s all about motivation. He put in FOUR spigots which you can see here, so there are lots of options for watering with timers, drip hoses, garden hose, etc.

Luckily I was able to move really quickly to get this garden in the ground because I already had my garden plan 90% worked out, thanks to poring over this book during the winter:

I plotted out my planting on graph paper because I am the kind of person who likes doing that.
Then I got a few bags of compost and a box of organic fertilizer and prepared my bed. Turning over this bed was pretty easy as the old garden had left the soil nice and loose even all these years later. I AM at the very end of my pregnancy, so I only did a third of it at a time over the course of several days. Honestly it felt really good to do. And if jumping on a shovel isn’t helping the baby move down I don’t know what would.

I raked the soil down, staked out the boundaries with hot pink string (hey, it’s what we had), put in teepees for the beans to climb, laid soaker hose, and at long last planted my seeds!


This summer and fall we should be harvesting:
- 2 kinds of pole beans
- watermelon
- muskmelon (like cantaloupe)
- basil
- chard
- radishes
- carrots
- 3 kinds of tomatoes
- cucumbers
- lettuces
- jalapeno peppers
- pumpkins
- hops, of course!
It has been way, way too long since I worked in the soil. I haven’t grown veggies since I was a kid but I did extensive gardening with perennials and roses through my teens and early 20’s until I graduated college, moved to California, and had no place to garden anymore. It’s so good to have this in my life again. I figure I can just about manage to take care of a newborn and a new garden this spring – sounds like an excellent and full plate to me!
What kind of gardening, if any, have you done? Is anyone else a fan of homegrown veggies? Who thinks this was some crazy project for a 9 months pregnant lady to do? I figure if the pioneer women could do it, so could I :)
As you might remember, I’ve been on the lookout for dining room chairs so that we can sit at the farmhouse table I refinished. Surprise! They’re here!
When I was searching, I was a little worried that the kind of chairs I wanted, at the price I was willing to pay, would not show up in any reasonable timeframe. I wanted:
- traditional, attractive styling – not all straight lines
- dark stained wood, though a dark painted finish might be ok
- under $150 for four chairs
As I searched Craigslist and visited a few thrift stores over the next month, I realized my criteria were very hard to come by all in one place. I found ugly cheap chairs. I found expensive pretty chairs. I found tables with chairs not sold separately. I found light stained chairs for the right price but the wrong color.
And then one Friday at 5pm I found a brand new Craigslist ad from a local antiques warehouse saying that they had a bunch of junky antiques in temporary storage which they needed to clear out by the end of the weekend. I was knocking on their door when they opened on Saturday morning.
Long story short, I haggled the beardy fellow down to $75 for four semi-antique white oak chairs that had ALREADY BEEN re-glued, stripped, and totally sanded by a professional antiques restorer. And they were awesome.
![IMG_0285[1]](https://figtreesundays.files.wordpress.com/2013/02/img_02851.jpg)
They’re super sturdy, but look at the fetchingly slim ankles on these girls.

Front and back views:


I decided to stain them a nice dark brown, just shy of black-brown. I felt that since my table is mid-to-light orangey brown, contrasting darker chairs would be grounding in my white dining room. Also, that was my favorite combination when I was pinning inspiration photos.
The stain I used was Minwax Dark Walnut. I love how the grain showed up after staining! There are lots of variations and tiger stripes in the wood that catch the light. Because Minwax oil stains have a bit of sealer built into the product and the chairs are not going to get the same kind of abuse as a tabletop, I chose not to apply any kind of additional top coat but simply rubbed them down with Howard’s Feed N’ Wax. (I’m fine with them collecting some handling marks from time and use.) The chairs had been so nicely sanded by Mr. Antiques Restorer that they felt silky and finished even before the Feed N’ Wax, which is not always the case with freshly stained wood.
As for the seats, they were originally caned but I took them in a different direction. I made a cardboard template for the seat bottom (shown) and then cut the base out of 3/8″ plywood.

The bases are secured to the chairs with bolts through special threaded metal tubes the Chief installed. This way the seats can be removed and replaced whenever necessary without wearing out the fastening mechanism.

On top of the wood base is glued 1″ high density upholstery foam, wrapped in high-loft batting. I traced the template shape with a sharpie and cut out four foam seat pads with my bread knife, then cut the batting in roughly the same shape, about 4″ wider all around.
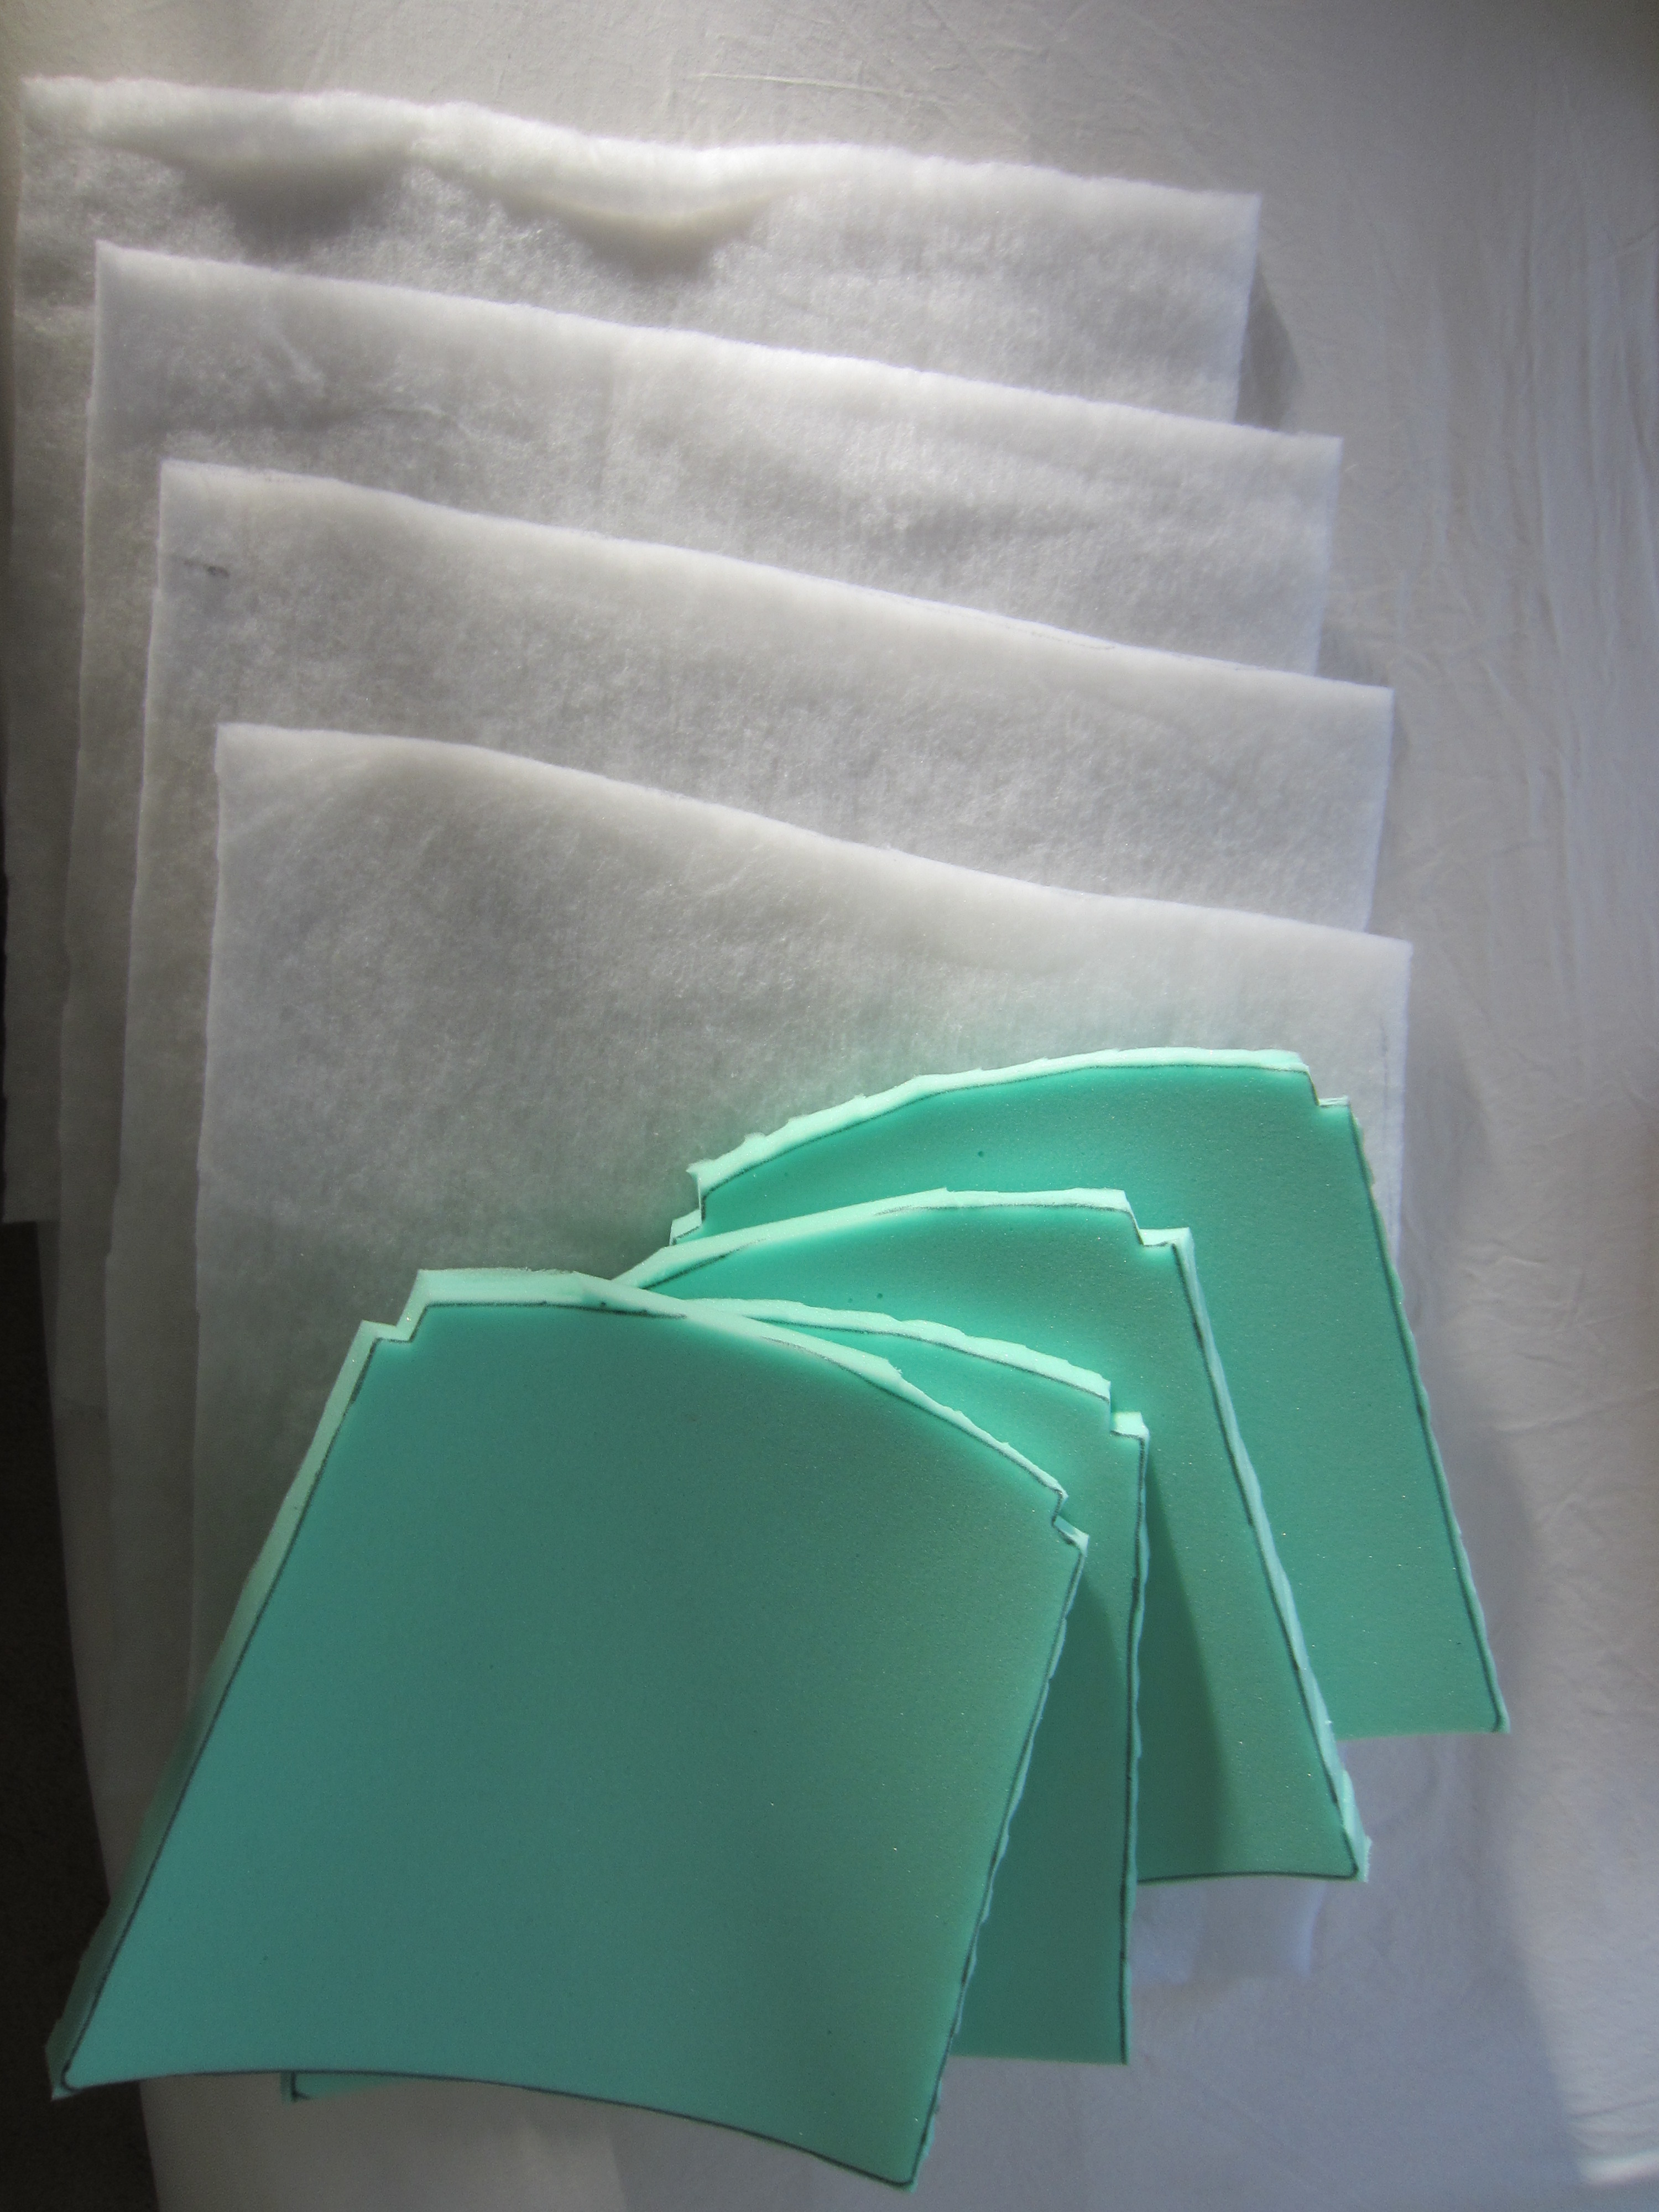
This was all glued and stapled in place over the 3/8″ plywood seats, then they were covered with Joann Fabric’s best-quality vinyl “leather”. I wanted a wipeable surface that could take children sitting on spaghetti and adults spilling wine!

I bought ALL these upholstery supplies with 40-50% coupons or sales because these are expensive items! Never buy anything over $5 at Joann’s without a coupon or a sale, say I.
Before I show you what we have, here’s one of my top inspiration photos. I love the look, though I can’t go that girly in our house. I also hope to make something like that swagged thing out of a drop cloth. I think it will add a lot of warmth to the blank wall we have without being as predictable as art or a mirror.

Source: mydesignchic.com via Julie on Pinterest
And now…. TA DA!! The most beauteous dining room our household has known. The eventual plan is to build a bench or banquette against the wall so that we can seat up to 7 at our table. What you see there in the pictures is actually the headboard of the full sized bed we used to sleep in. I doubt we will actually convert it to a dining bench but it makes a great placeholder while we have other parts of the house in disarray.


For now… I’m grateful that sit down dinners have become a reality again! No sooner did we start eating in chairs at the table than we started saying grace again and having conversations over the food, something that somehow fell by the wayside in the interim.
Have you ever had four months of dinners on the sofa while getting a dining area together? Or done any transformative chair reupholstering? Do share!
